
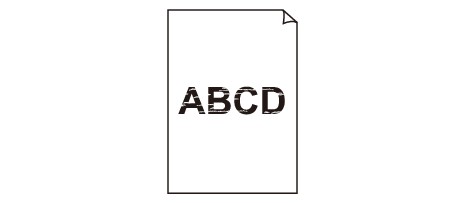
 Printouts Are Blank/Blurry or Fuzzy/Inaccurate or Bleeding Colors/Streaks or Lines

 Printing Is Blurry
Colors Are Wrong

White Streaks Appear


-
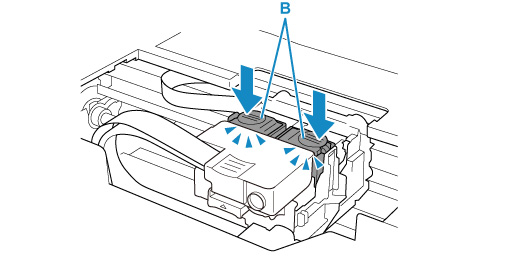
Check1 Make sure joint button is not lifted up.
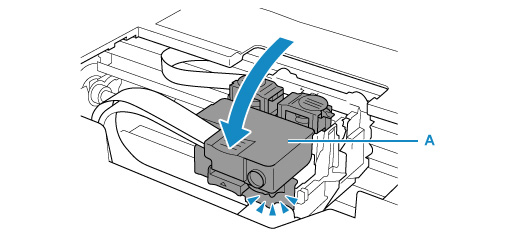
Push the print head locking cover (A) to make sure the print head is installed properly.
Next, push the joint buttons (B) firmly to the end.
 Important
-
Make sure that the orange label and the protective tape have been removed, when installing the print head.
-
Do not open the print head locking cover (A) carelessly. The ink may leak out.
-
-
Check2 Check paper and print quality settings.
-
Check3 Are the print head nozzles clogged?
Print the nozzle check pattern and make sure that the ink is coming out normally.
For details on printing the nozzle check pattern, print head cleaning, and print head deep cleaning, see If Printing Is Faint or Uneven.

-
Step1 Print the nozzle check pattern.
After printing the nozzle check pattern, examine the pattern.
-
From the printer
-
From the computer
-
For Windows:
-
For macOS:
-
If the pattern is not printed correctly, go to the next step.
-
-
Step2 Clean the print head.
After cleaning the print head, print the nozzle check pattern and check the result.
-
From the printer
-
From the computer
-
For Windows:
-
For macOS:
-
If it still does not improve, go to the next step.
-
-
Step3 Clean the print head again.
After cleaning the print head again, print the nozzle check pattern and check the result.
If it still does not improve, go to the next step.
-
Step4 Clean the print head deeply.
After cleaning the print head deeply, print the nozzle check pattern and check the result.
-
From the printer
-
From the computer
-
For Windows:
-
For macOS:
-
If it does not improve, turn off the printer, wait for more than 24 hours, and go to the next step.
-
-
Step5 Clean the print head deeply again.
After cleaning the print head deeply again, print the nozzle check pattern and check the result.
If it still does not improve, go to the next step.
-
Step6 Perform ink flush.
After performing ink flush, print the nozzle check pattern and check the result.
Ink flush consumes a great amount of ink. Frequent ink flush can rapidly consume ink, so perform it only when necessary.
If the nozzle check pattern is not printed correctly even after performing ink flush, check the installing condition of the print head.
ImportantPerforming ink flush when the remaining ink level is not enough may damage the printer.
Before performing ink flush, check the remaining ink level of all colors.
-
-
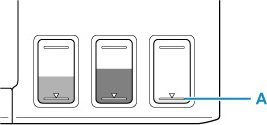
Check4 When an ink tank runs out of ink, refill the ink tank.
If the remaining ink level is below the lower limit line (A), refill the ink tank with the corresponding color of ink.
If you use the printer until the ink tank becomes empty, perform ink flush after refilling the ink tank.
-
Check5 When using paper with one printable surface, check the correct printable side of the paper.
Printing on the wrong side of such paper may cause unclear prints or prints with reduced quality.
When you load paper on the rear tray, load paper with the printable side facing up.
Refer to the instruction manual supplied with the paper for detailed information on the printable side.
-
When copying, see also the sections below:
-
Check6 Is platen glass dirty?
Clean the platen glass.
-
Check7 Make sure original is properly loaded on platen.
When you load the original on the platen, load it with the side to be copied facing down.
-
Check8 Is copy source a printed paper by printer?
If you use a printout done by this printer as the original, print quality may be reduced depending on the condition of the original.
Reprint from the computer if you can reprint from it.
![]() Note
Note
- Although some air may enter the ink tube, it is not a malfunction. No problem if the nozzle check pattern is printed correctly.
